Control Raspberry Pi: The Ultimate Web Browser Guide
Are you ready to unlock a new level of control over your digital life? Controlling your Raspberry Pi via a web browser is not just a convenience; it's a paradigm shift, offering unparalleled accessibility and flexibility.
Imagine a world where your projects, from home automation to intricate IoT setups, are accessible at your fingertips, irrespective of your physical location. This guide serves as your compass, navigating you through the essentials of remotely managing your Raspberry Pi. It's designed for both the novice and the seasoned enthusiast, providing clear, actionable steps to transform your Raspberry Pi into a remotely-controllable powerhouse. Get ready to redefine the boundaries of your digital capabilities.
| Category | Details |
|---|---|
| Project Type | Remote Raspberry Pi Control via Web Browser |
| Primary Goal | Enable remote access and control of a Raspberry Pi device through a web browser interface. |
| Target Audience | Hobbyists, professionals, and anyone interested in remote device management and IoT applications. |
| Key Benefits |
|
| Essential Tools | Raspberry Pi, Internet Connection, Web Server (Apache, Nginx), Web Browser. |
| Technical Complexity | Beginner-friendly with moderate setup complexity. |
| Potential Risks | Security vulnerabilities if not properly secured. Requires careful configuration of network settings. |
| Reference Link | Raspberry Pi Foundation |
Let's be frank: why grapple with the intricacies of SSH or the limitations of physical proximity when a web browser offers a superior experience? The advantages are numerous and compelling. Remote accessibility empowers you to oversee your operations from any corner of the globe, and simplifies project management. This transcends mere convenience; it symbolizes efficiency, control, and limitless possibilities. Its about taking your digital landscape into your own hands and moulding it to your specifications.
- Hyungry Temp Replacements Your Guide To Success Your Brand
- Anjali Aroras Viral Video The Story Impact And More
Consider the practical advantages. No longer tethered to a specific location, you gain the liberty to monitor sensors, modify settings, or execute scripts at will. Whether it's fine-tuning your home automation system while on holiday, or swiftly rectifying server issues from your office, the capability is invaluable. The user-friendly interface of a web browser streamlines these tasks, particularly appealing to those who find command-line interfaces intimidating. It presents a seamless integration pathway with web-based tools and platforms, expanding the capabilities of your Raspberry Pi.
The ability to control your Raspberry Pi via web browser is not just a tech project; it's a demonstration of ingenuity. You are, in essence, creating a digital command centera hub from which you can control your technological ecosystem.
Now, shifting gears, let us delve into the practical aspects. The process, while straightforward, demands a methodical approach. It begins with the establishment of a web server and configuring network accessibility. The subsequent phase involves selecting the optimal software for your requirements, be it WebIOPi for hardware control, Pi-Hole for network management, or OpenHAB for an advanced home automation system. Robust security measures are paramount, encompassing password fortification, access restrictions, and system updates. Finally, there are advanced techniques like SSH over Web and the creation of custom web interfaces, which offer deeper levels of control and personalization.
- Att Customer Service Your Ultimate Guide To Help Solutions
- Temporary Replacement 3 Your Guide To Temp Staffing
The initial step is the installation of a web server on your Raspberry Pi. Apache and Nginx are popular, with Apache chosen here for its simplicity. By executing the command: `sudo apt update && sudo apt install apache2 -y` in your terminal, you initiate the installation process. Once completed, validating the installation by entering your Pi's IP address into a web browser is standard procedure. A successful installation presents the default Apache page.
The next critical step is enabling remote access, which necessitates setting up port forwarding on your router. This typically involves forwarding port 80 (HTTP) or 443 (HTTPS) to your Pi's local IP address. Employing a dynamic DNS service is highly recommended. These services such as No-IP or DuckDNS, assign a domain name to your Pi, thus circumventing the need to constantly update your IP address in case it changes.
As you begin, the choice of software becomes paramount. It's here you tailor your setup to your specific needs. WebIOPi is engineered for direct control of GPIO pins, perfect for sensor-based projects. For DNS and network management, Pi-Hole is ideal. For comprehensive home automation, OpenHAB is the top choice. Each one is tailored to a specific application, from managing your home network to designing a full-blown smart home control center.
With the Raspberry Pi now functioning as a web server, the next step involves choosing the right software to facilitate control. This choice depends greatly on your intended application. The options include:
- WebIOPi: This is a great choice if you're looking to interface with hardware components like sensors, LEDs, and motors. WebIOPi is especially suited for projects centered around GPIO pins. The installation is simple, typically done with the command: `sudo apt install webiopi`. Once installed, access the interface by navigating to `http://your-pi-ip:8000` in your browser.
- Pi-Hole: Pi-Hole is an excellent choice for managing network settings. It functions primarily as an ad-blocker for your home network. It also provides a web-based admin panel, which allows for extensive configuration of DNS and related settings.
- OpenHAB: OpenHAB is the most advanced option, providing robust functionality for home automation. It enables control over a vast array of IoT devices through a single web interface, enabling total control. While the setup may be more complex, the outcomes often justify the effort.
The security aspects are critical. Given that the entire principle revolves around remote access, ensuring that your Raspberry Pi is secure should be your top priority. If your web interface is exposed, the potential risks are clear. You should implement strong passwords, enable two-factor authentication where available, and restrict access to specific IP addresses. Keeping your software and firmware updated mitigates vulnerabilities, and consider using HTTPS for encrypted communication.
Remember, in the realm of cybersecurity, a proactive approach is essential. Security is not a 'set and forget' process; it requires continuous vigilance. This means regular assessment of your setup, identification of weak points, and implementing immediate measures to address them.
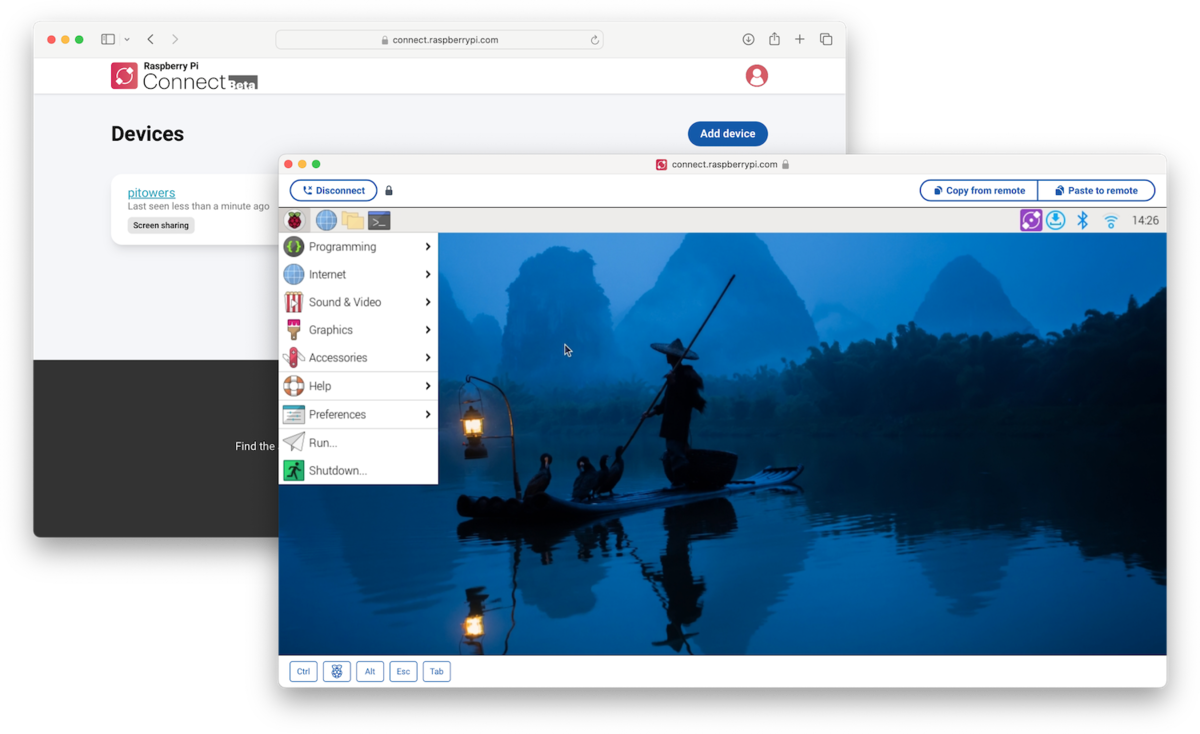
After you have mastered the fundamentals, its time to advance. The advanced techniques give you more customization and control. Among these advanced techniques are SSH over Web and custom web interfaces. SSH over Web offers direct access to the Pis terminal through a web browser, while custom interfaces allow for a tailored experience using web technologies like HTML, CSS, and JavaScript. Consider these advanced options.
The ability to use SSH commands from within your browser is within reach, thanks to tools like WebSSH2. These tools make it possible to access your Pis terminal remotely without the need for additional software installations. Just navigate to the WebSSH2 website and enter your Pis IP address to get started.
For the more adventurous, creating a custom web interface can be a rewarding experience. This allows you to design a personalized control panel specific to your needs, showcasing real-time data from your sensors, or controlling your devices with a click of a button. This is a great way to have complete control over your project. With skills in HTML, CSS, and JavaScript, you are fully equipped to build your own custom dashboard.
Even the most carefully designed projects can have problems. Being prepared to solve those issues is key to staying in control of your project. Let's address the common ones and suggest solutions.
- Problem 1: Cant Access the Web Interface. Solution: The first troubleshooting step is to recheck your Pis IP address and confirm that port forwarding on your router is configured correctly. You should also check your firewall to ensure that incoming connections are not being blocked.
- Problem 2: Slow Performance. Solution: Optimizing your web server settings or considering an upgrade to your Pi's hardware might be required. More RAM and a faster processor often make a significant difference.
- Problem 3: Security Breach. Solution: Immediately change all passwords, disable unnecessary services, and review your security settings. Learn from the experience to strengthen your defenses.
According to a survey by the Raspberry Pi Foundation, over 40 million Raspberry Pi units have been sold worldwide. Of those, a large percentage are used for remote access and IoT projects. By learning how to control your Raspberry Pi via a web browser, you join a global community of innovators and makers.
A study found that web-based interfaces significantly improve user engagement and satisfaction compared to command-line tools. This highlights the importance of gaining expertise for both professional and personal use.
The journey of learning how to control a Raspberry Pi via a web browser is a comprehensive one. This includes setting up your Pi, securing it, and troubleshooting common problems. Success comes from practice. Don't be afraid to try new approaches, experiment, and continuously refine your skills. The world of remote control is at your fingertips.
Detail Author:
- Name : Ellsworth Towne V
- Username : fpaucek
- Email : kelsie.marvin@leannon.com
- Birthdate : 1970-08-09
- Address : 98003 Okuneva Ridges Svenbury, MT 38133
- Phone : +1 (619) 560-8807
- Company : Schulist, Heathcote and Dooley
- Job : Boiler Operator
- Bio : Enim repellendus alias doloremque id omnis ab. Quisquam ipsam dignissimos minus veritatis commodi. Aut perferendis pariatur eveniet voluptates.
Socials
linkedin:
- url : https://linkedin.com/in/francesco1416
- username : francesco1416
- bio : Reiciendis eum iure unde qui.
- followers : 4491
- following : 60
tiktok:
- url : https://tiktok.com/@francescoortiz
- username : francescoortiz
- bio : Neque in voluptatibus sunt libero ut ut culpa. Eveniet quibusdam libero quo.
- followers : 4918
- following : 1605
instagram:
- url : https://instagram.com/ortiz2013
- username : ortiz2013
- bio : Neque veritatis exercitationem praesentium explicabo repellat placeat. Omnis ab et et beatae.
- followers : 1798
- following : 2342
facebook:
- url : https://facebook.com/fortiz
- username : fortiz
- bio : Odio modi aut accusamus eius temporibus nesciunt.
- followers : 5060
- following : 1422
